Shopify
The Shopify integration allows Karla to retrieve order updates from your shop and display them on your customers' tracking pages (e.g., purchased products, shipping address, etc.) as well as retrieve all tracking numbers to provide corresponding tracking updates.
Install the Shopify App
Install our Shopify App and follow the onboarding steps.
Tracking page links
By default, the Karla app provisions a tracking page on your Shopify domain (including all market domains), that you can use right away:
If your markets use subfolder paths (e.g., /de, /de-at), include the market prefix: https://[yourdomain]/de-at/apps/karla/track. For subdomain or separate domain markets, simply use that domain as [yourdomain].
Order Tracking
- Logged-in customers see their recent orders. Guests see the order finder.
https://[yourdomain]/apps/karla/track
- Direct link for logged-in customers:
https://[yourdomain]/apps/karla/track?orderNumber=00001
- Direct link for guests (zip code required):
https://[yourdomain]/apps/karla/track?orderNumber=00001&zipCode=10119
Issue Resolution
- Logged-in customers see their recent orders. Guests see the order finder.
https://[yourdomain]/apps/karla/resolve
- Direct link for logged-in customers:
https://[yourdomain]/apps/karla/resolve?orderNumber=00001
- Direct link for guests (zip code required):
https://[yourdomain]/apps/karla/resolve?orderNumber=00001&zipCode=10119
00001 (order number) and 10119 (zip code) are example
values. Replace them with your customer's actual order number and zip
code to create a deep link to any specific order. Zip code is only required if the customer is not logged in.
Advanced: Setting up your own Tracking Page template
You can add the Karla tracking widget to any Shopify template of your choice.
Adding the widget to your default page template will override all pages that use that template (info pages, help center, guides, etc.). Always use a dedicated template.
Step 1: Add the tracking widget to a theme (pick one method)
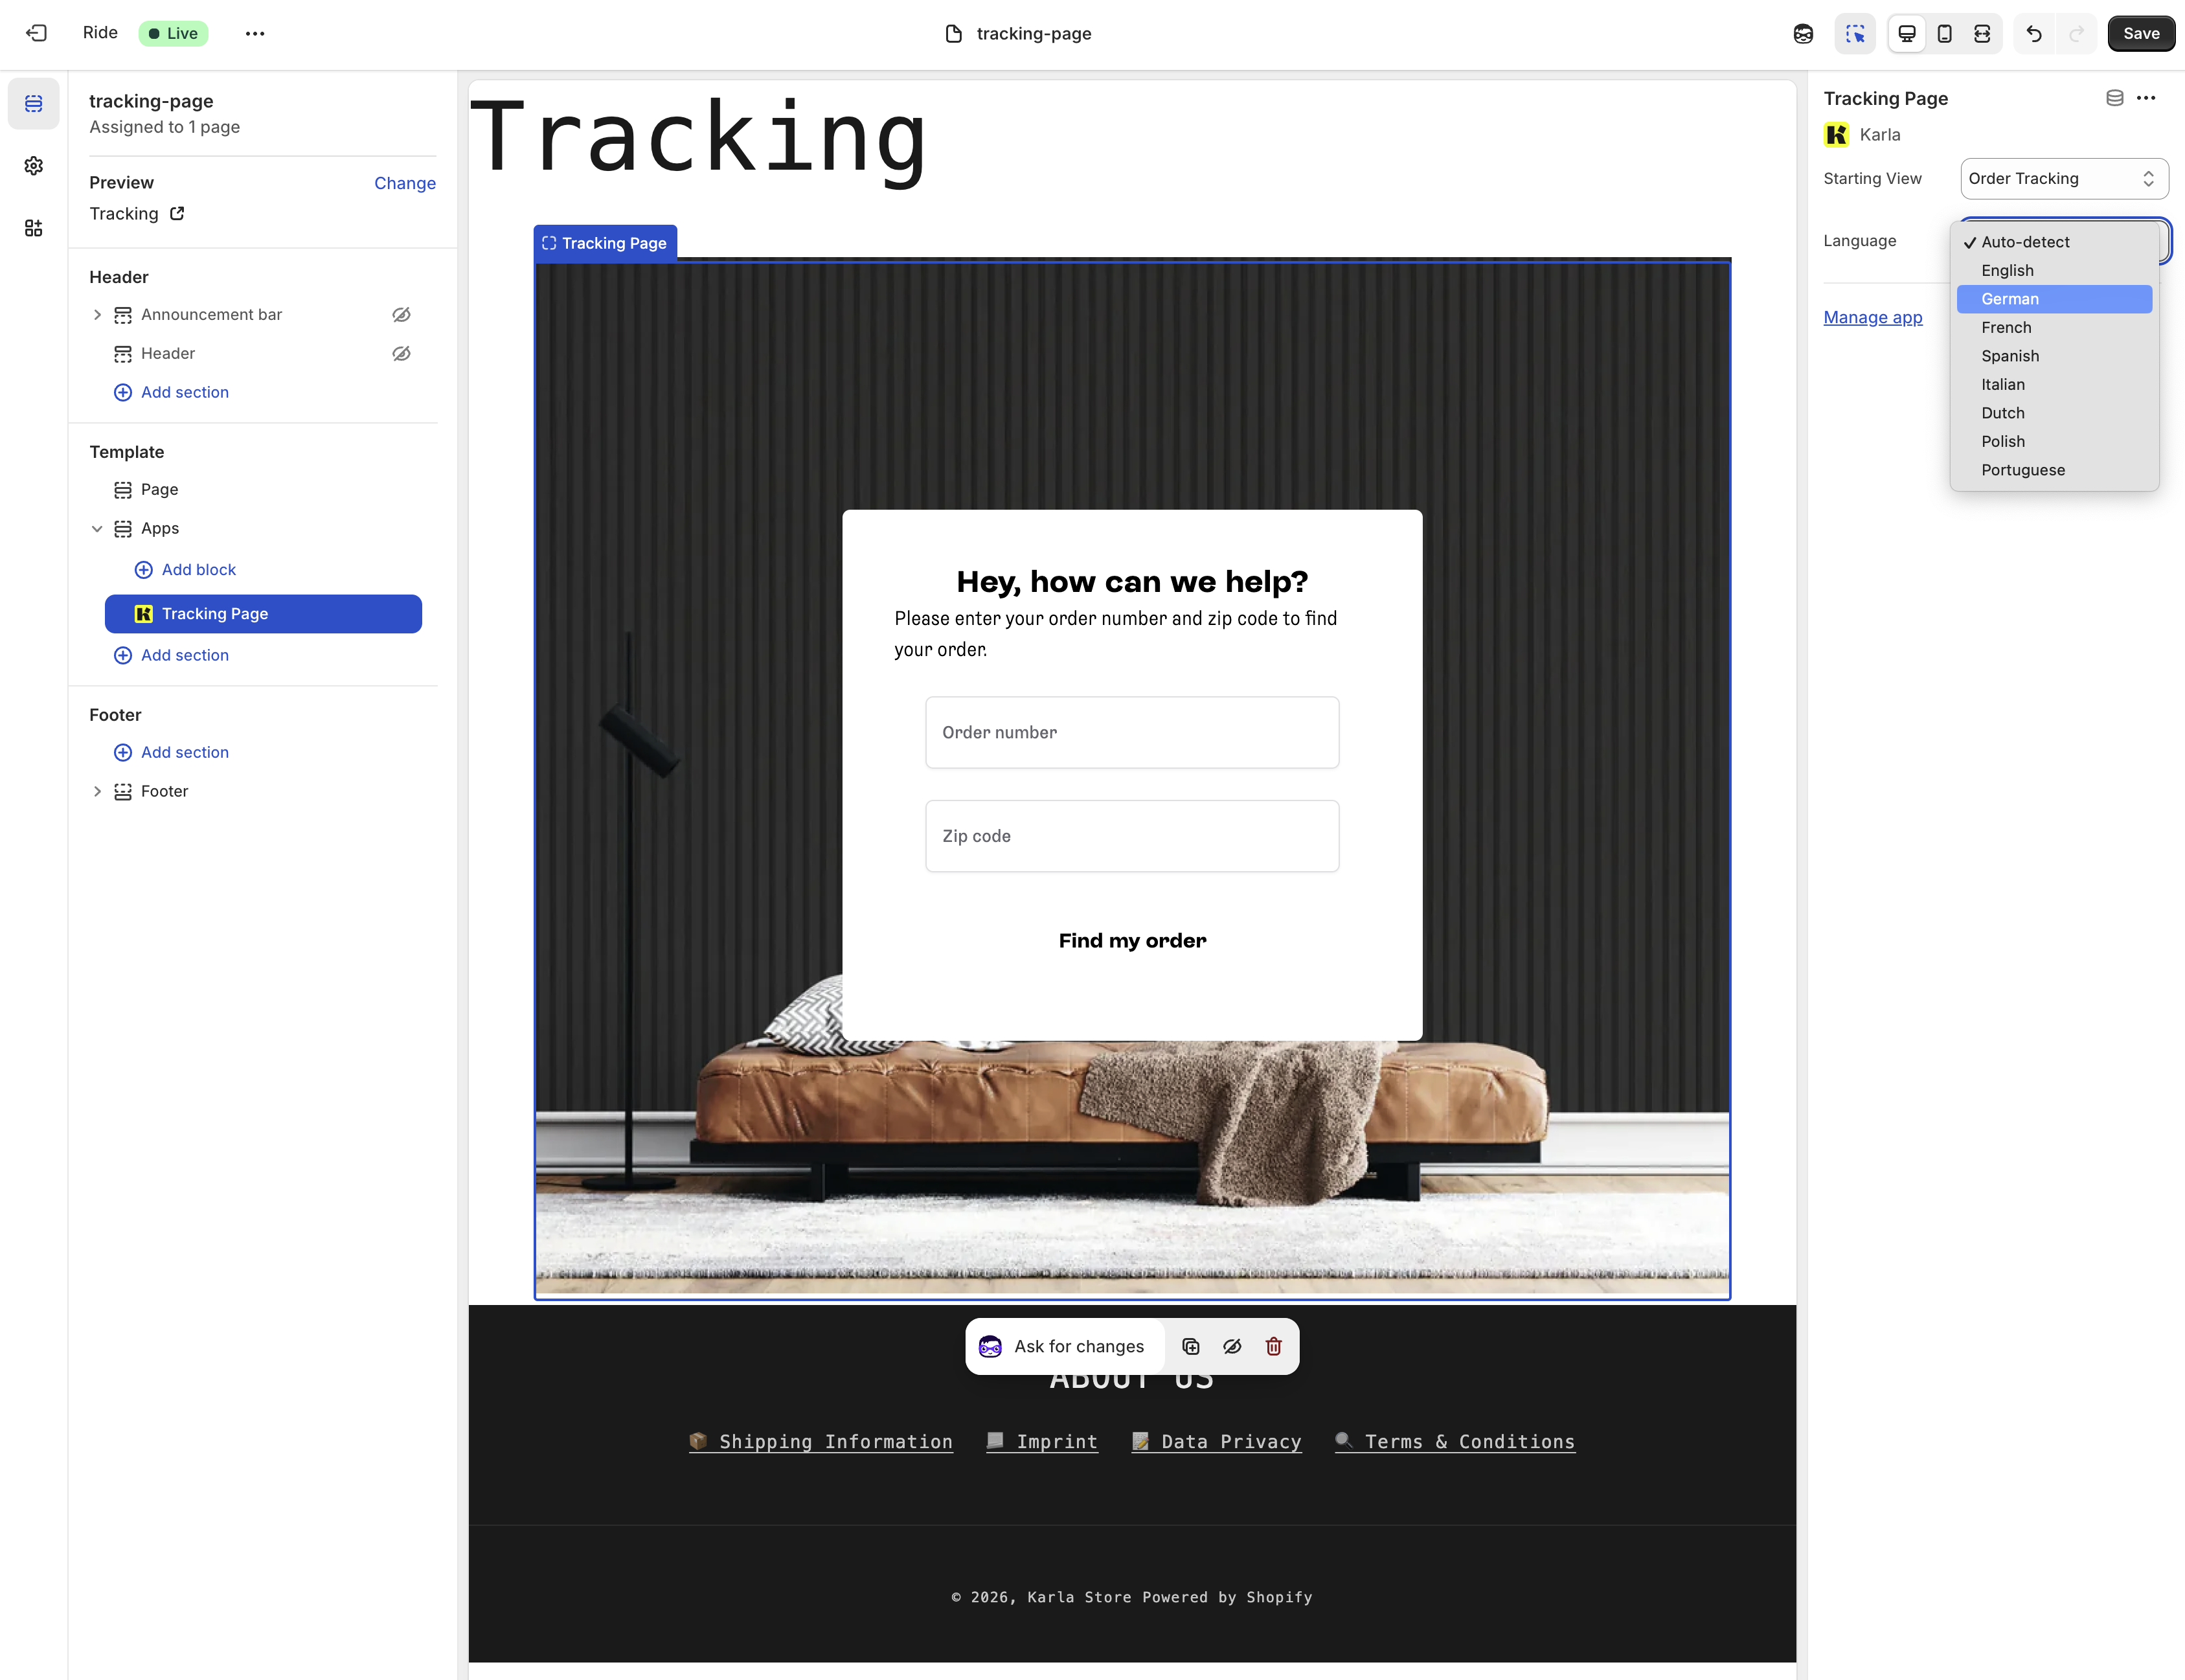
Our app includes a ready-made Tracking Page block that you can add via the theme editor:
- Go to Online Store → Themes → Customize
- In the top navigation, select Pages → choose your tracking page
- Click Add section and look for the Tracking Page block (under "Apps")
- Configure language and starting view in the block settings
- Remove the default content section if you want the tracking widget to be the only content
- Click Save
This approach automatically inherits your theme's fonts and colors, supports logged-in customers (they will see a very simple list of their latest orders to pick if they are logged in and no orderNumber query parameter was given), and requires no code.
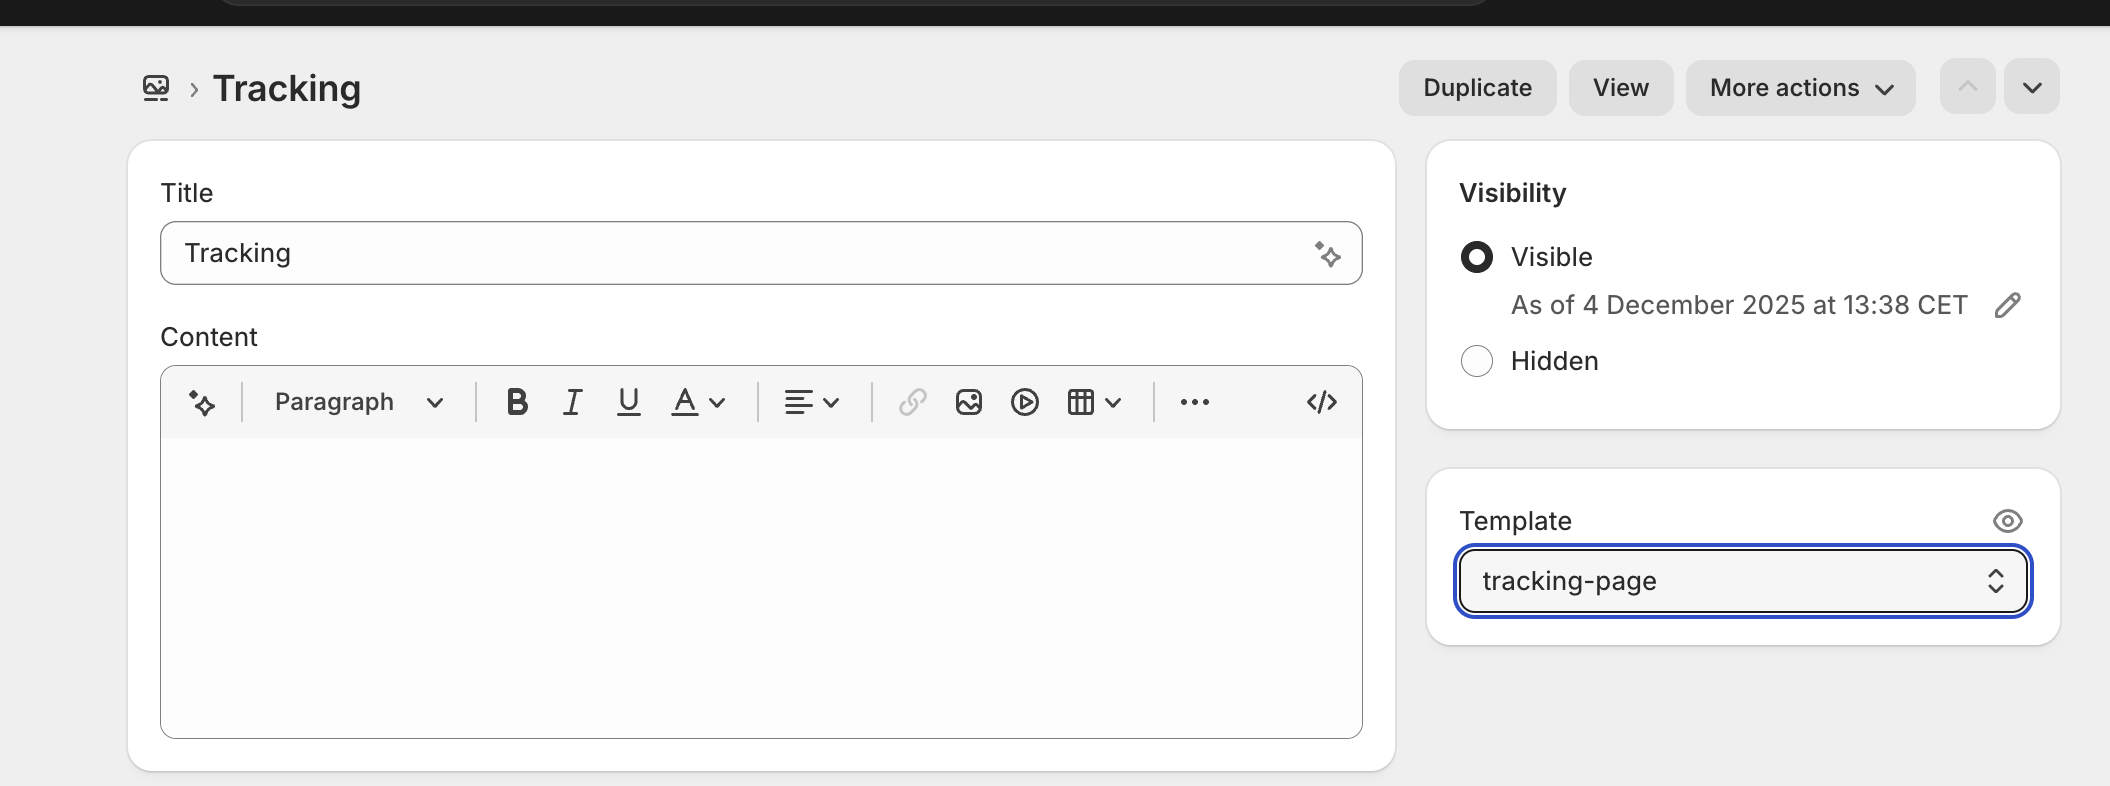
Step 2: Create a page based on the template
- In your Shopify admin, go to Online Store → Pages
- Click Add page
- Set the title (e.g., "Track your order")
- Select the template
- Publish the page
Advanced: Campaign attribution
Our Shopify app also allows you to track which orders come from your Karla campaigns. For a complete overview of attribution methods across all platforms, see the Campaign Attribution Overview.
Method 1: Shopify app
All call-to-action links in the portal campaigns will automatically have query parameters that start with karla_, identifying the source, medium, and specific campaign. In addition, a ref=karla parameter is added by default in all interactions.
When customers click on those links, our Shopify app will detect the interaction at checkout time, and send the attribution information if the customer places the order.
This method is simple but has limitations inherent to how Shopify handles cart sessions.
Method 2: Discount codes
Simply add a discount code to your campaign in the Karla portal. Orders using this discount will be automatically attributed to the campaign.
Verifying orders in Shopify:
Navigate to Orders → Filter by Discount code to see all orders that used your campaign discount.
For complete details on discount code attribution, best practices, and limitations, see Discount Code Attribution in the Campaign Overview.
Advanced: Custom Properties
Add custom properties to your Shopify orders to enhance your customers' delivery experience with Karla.
Understanding Scopes
Shopify supports two types of custom data, and we always prefix them with _karla_:
- Order attributes:
- Apply to the entire order
- Use Shopify
attributes
- Line item properties:
- Apply to individual products
- Use Shopify
properties
Order Attributes
These attributes will appear in the Additional details section of your order admin panel.
Marketplace Order Number
Use _karla_marketplace_order_number to track orders from external marketplaces (Amazon, eBay, etc.):
- Format: Any string (alphanumeric, dashes, and underscores supported)
- Scope: Entire order
- Use case: Reference external marketplace order IDs for cross-platform tracking
Order attribution variables
These parameters are automatically handled by our order attribution tracking script, but you can manage them yourself if you want full control over Karla's attribution logic.
These variables are:
_karla_campaign: Campaign identifier_karla_captured_at: Timestamp when the attribution was first captured_karla_landing_path: Path on your shop where the customer landed_karla_landing_url: Full URL where the customer landed_karla_medium: Marketing medium (e.g., email, banner, push notification)_karla_referrer: HTTP referrer URL_karla_source: Traffic source identifier (e.g., trackpages, karla-lounge)
Line Item Properties
Line item properties apply to individual products and are added using the properties parameter.
Estimated Ship Date Range
Specify when a product is expected to ship using a date range:
_karla_estimated_ship_date_start— earliest expected ship date (required)_karla_estimated_ship_date_end— latest expected ship date (optional)
Providing both properties creates a shipping window (e.g., "Ships between Oct 23 and Oct 30"). Providing only _start displays a single estimated date. _end without _start is ignored.
- Date formats accepted: any ISO 8601 date string (preferred), or common date strings like
23.10.2025or10/23/2025 - Scope: Individual line item
Complete Implementation Examples
Example 1: Adding Line Item Property (Product Page)
On your product page, add line item properties to the "Add to Cart" form:
<form action="/cart/add" method="post">
  <input type="hidden" name="properties[_karla_estimated_ship_date_start]" value="2025-10-23">
  <input type="hidden" name="properties[_karla_estimated_ship_date_end]" value="2025-10-30">

  <input type="hidden" name="id" value="{{ product.variants.first.id }}">
  <button type="submit">Add to Cart</button>
</form>
Example 2: Adding Order Attribute (Cart Page)
There are two methods depending on your theme type:
Method A: Traditional Form (Older Themes)
If your theme uses traditional cart forms (typically older themes or custom implementations):
<form action="{{ routes.cart_url }}" method="post" ...>
  <!-- Your cart items display here -->

  <!-- Order attribute: marketplace order number, add before the </form> tag -->
  <input type="hidden" name="attributes[_karla_marketplace_order_number]" value="{{ your_marketplace_order_number }}">
</form>
Method B: AJAX Cart (Modern Themes)
Most modern Shopify themes (Dawn, Refresh, etc.) use AJAX for cart operations. For these themes, add this JavaScript to your theme file (e.g., theme.liquid), before the closing </body> tag:
{% if customer.metafields.custom.marketplace_order_id %}
<script>
  fetch('/cart/update.js', {
    method: 'POST',
    headers: { 'Content-Type': 'application/json' },
    body: JSON.stringify({
      attributes: { '_karla_marketplace_order_number': '{{ customer.metafields.custom.marketplace_order_id }}' }
    })
  });
</script>
{% endif %}
Replace your_marketplace_order_number with your actual Liquid variable containing the marketplace order ID.
Troubleshooting
Attributes/Properties not showing?
- Check spelling: must be exactly the documented key name (lowercase, double or single underscores respectively)
- Ensure properties/attributes are inside your
<form>tag - For order attributes, use
attributes[...]notproperties[...] - For line item properties, use
properties[...]notattributes[...] - For modern themes: If hidden inputs don't work, use the AJAX method (Method B) instead
Order attributes still empty in cart.js?
- Your theme likely uses AJAX cart → Switch from Method A (hidden input) to Method B (JavaScript)
- Check browser console (F12) for errors
- Make sure the script runs after items are added to cart
Attributes/Properties visible to customers?
- Make sure property name starts with double/single underscore
Dates not working?
- Use format:
YYYY-MM-DD(e.g.,2025-10-23) - Or:
DD.MM.YYYY(e.g.,23.10.2025) - Or:
MM/DD/YYYY(e.g.,10/23/2025)
The ideal format is an ISO 8601 date string, but we have extra parsing to accommodate non-standard dates (best-effort).
Quick Reference
Order
| Property | Type | Example |
|---|---|---|
_karla_campaign | String | 8c0b2fcf-c0a0-46f7-8383-1cac748f35c0 |
_karla_captured_at | String | 2025-10-23T14:30:00Z |
_karla_landing_path | String | /products/shoes |
_karla_landing_url | String | https://shop.myshopify.com/products/test?karla_source=email |
_karla_marketplace_order_number | String | AMZN-12345-67890 |
_karla_medium | String | social |
_karla_referrer | String | https://google.com |
_karla_source | String | trackpages |
Order line item
| Property | Type | Required | Example |
|---|---|---|---|
_karla_estimated_ship_date_start | Date | Yes | 2025-10-23 |
_karla_estimated_ship_date_end | Date | No | 2025-10-30 |